Saturday, June 30, 2012

Guilty Pleasure

Ok, confession time.

For as long as I can remember I have HATED sweet potatoes and no, I don't think in this case that hate is too strong a word. I've tried, really I tried...and my taste buds just tell me to spit them out.

When I moved to Hawaii I even tried the famous Okinawa purple sweet potatoes - Yuck!

Two Thanksgivings ago I made a Rachel Ray recipe that used fingerling potatoes, including tiny sweet potatoes (recipe I've posted before). I thought with all the cream and cheese I might be able to get them down, but sadly I was mistaken.

Known on the mainland as Black Angus
A while back, Roger and I enjoyed lunch at The Cattle Company. They had something new on the menu - sweet potato fries with maple dipping sauce.

(side note - Sweet Potato fried seem to be popping up all over the place. You can even get them in the freezer section of the grocery store)

Roger put in his order


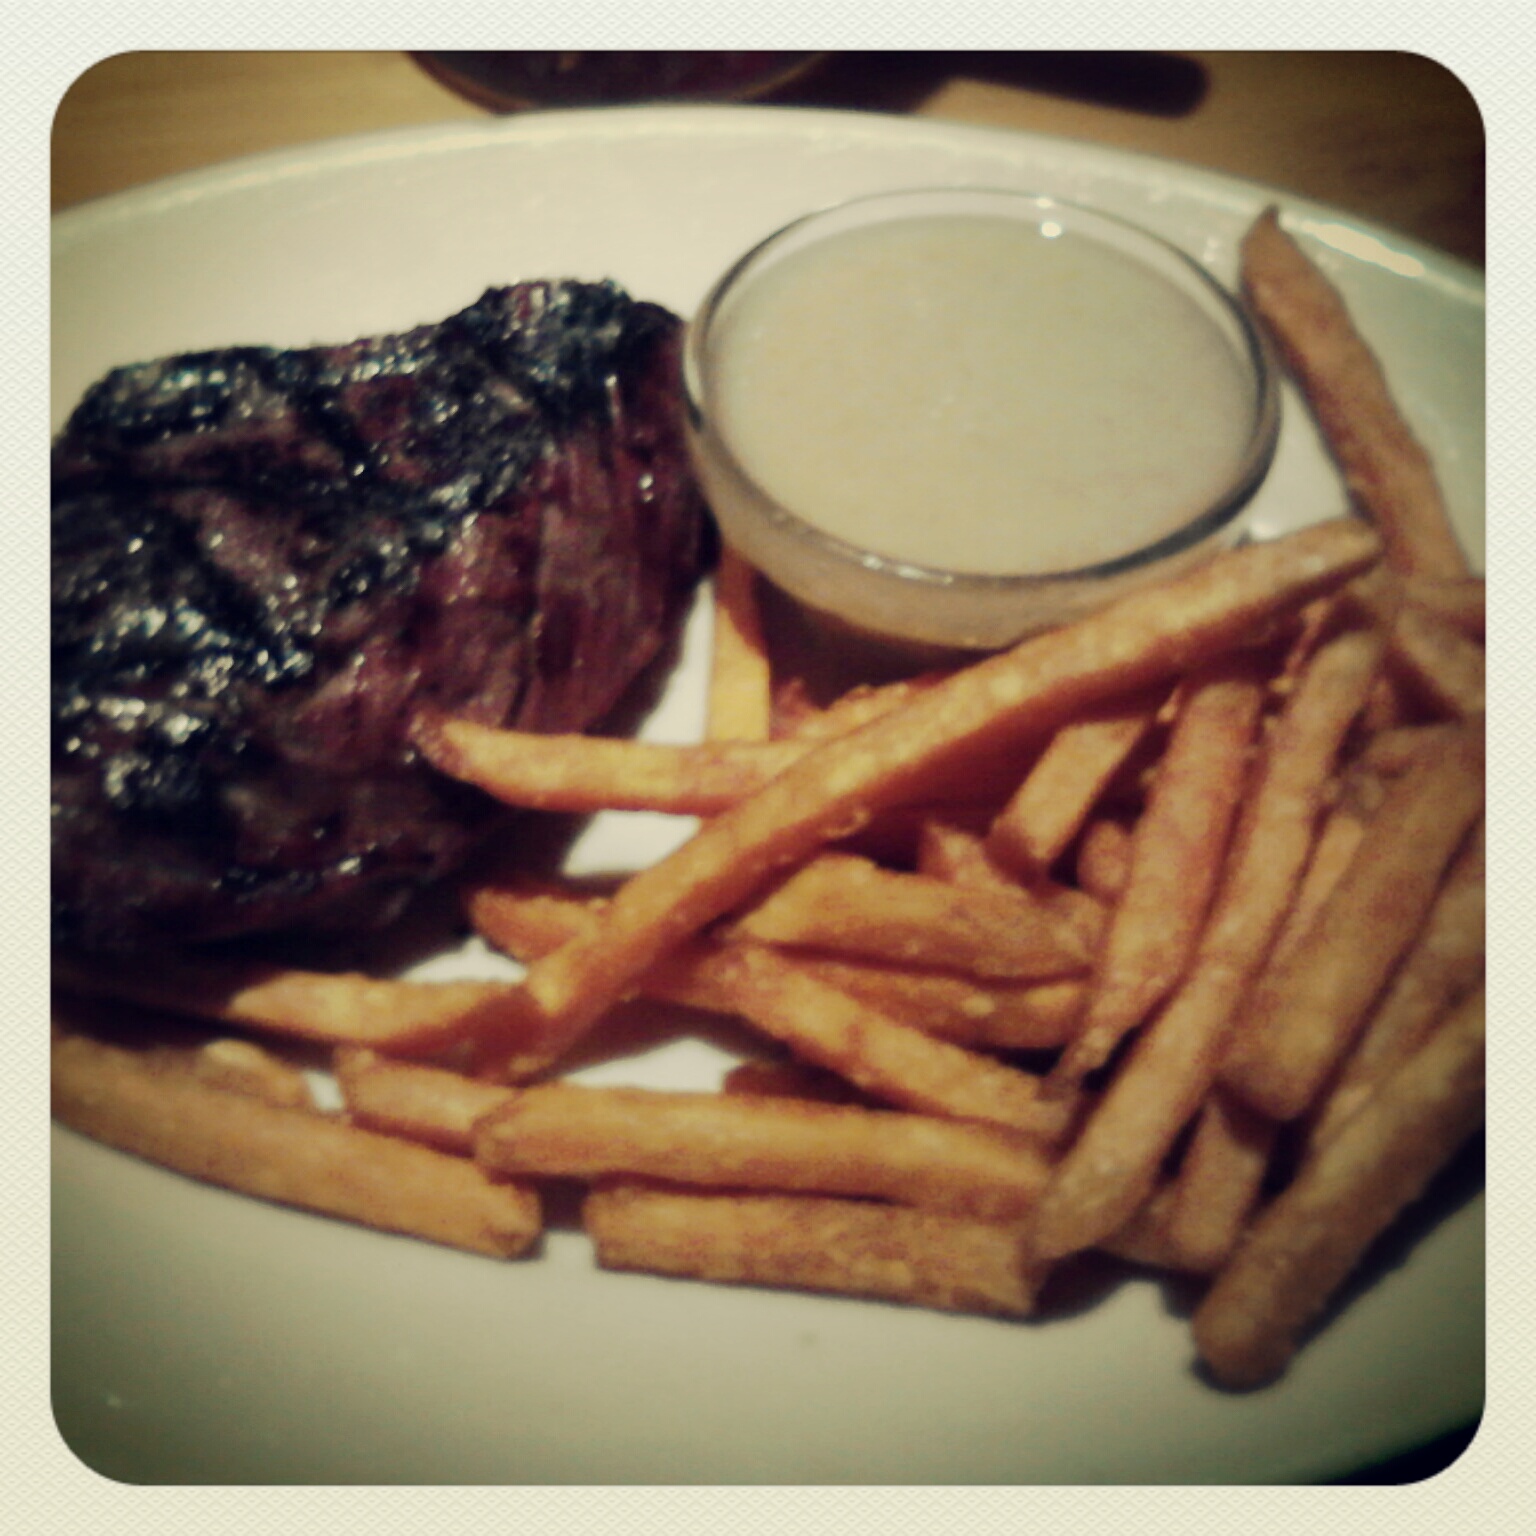
Our meals were served PDQ (pretty darn quick). The sauce looked interesting and Roger jumped right in and said that they were good, but the sauce was a bit sweet.

I think it was the sauce.

It was calling me.

Taunting me.

"I know you want to try me, I dare you. Try me!"

Of course I did and I liked them...really really liked them. The dipping sauce - Although at first I thought it was too sweet, I am now addicted to it.  

So addicted I have got to figure out how to make it.

I found this recipe today...will have to try it:


Ingredients:
All you need:
1 (22-oz) pkg frozen sweet potato fries (Seem to be very popular right now - you see them everywhere)
¼ cup plain Greek yogurt OR light sour cream
¼ cup Hy-Vee low-fat plain yogurt
2 tsp Grand Selections maple syrup
¼ tsp ground cinnamon
Directions:
All you do:
1. Cook sweet potato fries according to package directions.
2. Meanwhile, for sauce, in a small bowl combine sour cream, yogurt, maple syrup and cinnamon.
3. Serve fries with dipping sauce.
Nutrition facts per serving:
205 calories, 8g fat, 1g saturated fat, 5mg cholesterol, 200mg sodium, 33g carbohydrate, 4g fiber, 3g protein
Source: Hy-Vee recipe of month

Bon Appetite and Aloha a Hui Hou!

Thursday, June 28, 2012

Back Door, Check

Finally, finally the back door arrived. We had ordered it at the same time that we ordered the front door, knowing it would take a bit longer because the chinchilla glass was not something they had in stock.

The designer that took the order never bothered to keep us posted on the status of the door or the delivery date. So while we were there Lisa gave her a call and found out the delivery date would be some time around the 5th of June.

The 5th past, the 6th, the 7th....no news. Lisa called again and found out that they "lost" the door. Couldn't find it, what ever. It wasn't there. They will have to make a new one and it would be done in a week.

Say what?
First of all - how do you loose a door?
Second, if it took them 6 weeks to make the first one, why does it only take one week to make a new one?

I'm sure these are questions that will never be answered ...

ANYway, the contractor picked it up, making sure there wasn't a mistake like last time - where they made the wrong jam.

So, without further ado, here is a before pic

This seems to be the only pic I have of the back door

It was a dark wood door

With no windows.

The stairwell was a dark place.

Spiders live there.

Now here it is, the new back door.


As you notice, the door is a bit different than the front door. The style of the front door was not available in the much narrower size that we needed for the back so we opted for a paint grade door that looked at least a bit similar. Wrote all about it here.

I'm not sure what color we will paint it yet, but for now it's primed and has a coat of white paint to protect it from the elements.

We do want to have the screen door put back on.


It's not framed out yet, the new frame will look like the rest of the window frames in the house and will go all the way to the corner (hate painting in those tight corners!). I think we'll leave the inside white. Makes it more friendly and  bright.

We cam't ignore all the natural light that's coming in. Just look at it!

Can't wait To see it in person.

Now we just have to figure out what we will do with the stairwell walls.

One thing does lead to another...

Aloha a Hui Hou!

Wednesday, June 27, 2012

Product Review - Butter Keeper

Some time in December Amy, at Homestead Revival, posted an entry about a butter keeper that Pantry Paratus was offering. I thought it was really cute and ordered one for us (not for Hawaii - too warm here), one for my mother in law and sister in law.

It wasn't until our trip that I was able to test mine, so here are my thoughts.

First I want to say what a great little company. I ordered the keepers and had them sent to my M-i-L. I wasn't too sure about the shipping to a different address than the billing address. A quick call took care of that.

Since they were kind of Christmas gifts I didn't find out until after the holidays that one of them was broken. Popped them an email and they UPS'd (or was it FedEx'd?) a new one right away. I give their Customer service a 5 our of 5

What? You ask what a butter keeper is? OK, let me explain.

You put the butter into the small cup of the keeper. Once it gets a bit softer you can spread it out so it fits and sits in the cup (as you see in the pic). In the bigger cup you put enough water, so that when you invert the small cup into the larger cup the water creates an air tight seal. Wah-la! Spreadable butter! no more making a mess of your bread when buttering! All you have to remember to do is switch out the water every 3 days.

So now to my review of the the Butter Keeper. :


  1. The design looks vintage. Reminds me of a stone crock. 
  2. It holds EXACTLY one stick of butter
  3. It's nice and solid. Will take some abuse
  4. Dish washer safe.
  5. Since butter naturally repels water - the butter was never wet


Over all it was a great purchase. We both loved having spreadable butter for our toast in the morning. Again, I give it a 5 out of 5.

Aloha a Hui Hou!

Tuesday, June 26, 2012

HGTV's Rate My Space

I love the transformations of our kitchen and Bath so much that I posted them over on the HGTV Rate My Space page.

Stop by and check my posts, here and here and Rate my Spaces! (Clicking on the underlined text will take you to their page)

Aloha a Hui Hou!

Monday, June 25, 2012

Re-styled clock

OK, to tell this one I'm going to have to go waaaay back...around 7 years back....

There we were, still living in Waikiki, still diving...you know, back in the day. Rogers' old kitchen clock gave up and we needed a new one. I got lucky at Pricebusters and found a kitchen clock for a buck fifty....I can't even buy a quartz mechanism for that money. Of course I bought it. It looked kinda like this

We enjoyed the clock for a few years, until IT gave up. So I was looking for a new clock. On eBay I came across a seller that will personalize your kitchen clock. I picked one out and had it personalized.

The tops of the hands were originally black and they didn't pop off the face of the clock so it was hard to see the time. I took it apart and painted the tips red...there, that's better. Another thing, the clock was kinda small.

But wait, I'm crafty. I still had the other clock and the black clock fit EXACTLY into the middle of the frame from the other clock, so I glued it in place. To match the faceplate I painted the silver trim gold and the outer rim a tan color. It looked great and really fit in our kitchen.

I was looking forward to hanging it up in our new kitchen. So I packed it up and shipped it over.

Now I have some good news and some bad news. The good news it made it from Hawaii. Bad news is  that even though I packed it very well, the plexiglass had a small crack...but I think I can live with it.

ANYway, looking at it next to the cabs - the colors didn't work. That meant I could go to the craft store - which can always be a dangerous thing - and buy some paint. Which I did, along with some other craft items...of course.

This is how it turned out. I think it goes well with the colors in the kitchen and fits perfectly over the new archway.


I love that we have things that are uniquely ours.

Aloha a Hui Hou!

Sunday, June 24, 2012

Side Table Revamp

Yet another thing Roger's parents gave us - a set of side tables. They had them as a young couple and Roger can remember polishing them with furniture polish till they gleamed.

one of the two tables.
I like the look, but as they are....they just don't go with the style we are (I am) going for. I thought they will do for now and somewhere down the line we could look for something else. That was before I went to Hobby Lobby.....what a STORE! Good thing they don't have them here in Hawaii or I'd be a goner. 

ANYway, while I was browsing the fabric department I came across this:

Embossed brown pleather!
and it hit me! I could cover the tops with this stuff. Easy to clean, eclectic style...I bought a yard and a half.

Once at home I grabbed an X-acto knife, a pair of scissors, a rubber mallet, my heavy duty stapler and got to work


Because there is no way to get the fabric round the legs seamlessly I had to take the tables apart. A couple of whacks with the rubber mallet took care of that. 

I then cut the material and started stapling the fabric to the table tops. Let me tell you something - the wood substitute that the mahogany looking formica like surface was attached to WAS AS HARD AS A ROCK! Some staples didn't go in at all, others I had to give a couple of whacks.

Once I had the lower part of the table covered I had to cut holes with the X-acto knife for the pegs of the upper table legs.


Put everything back together, a few more whacks with the rubber mallet and there you have it!


Just like new! well almost....but look great and really go with the feel of the room. 


Next time I'll look for baskets to slide underneath for  some storage.

Aloha a Hui Hou!

Saturday, June 23, 2012

Vermont Bun Baker, revisited

You might remember the corner in the front room


and you might remember my drawing


and you might remember all my talk about it.

Well here it is now


Turned out very close to my vision and we're very happy with it. While we were there the temps dropped to the 40's and we fired'er up. Warmed up the house to a toasty 80F. Roger put in some wood before we went to bed and it was still warm in the morning and there were enough embers to get another log going in the morning.

Notice the blue, vintage coffee pot on top of the bun baker. Another antiquing find. We just used it to add a bit of moisture to the air, but we do have the insides so if we ever wanted to make coffee in it we could.
I love the smell of the wood and am really looking forward to enjoying baking in it....bread...maybe a flamkuchen!


aloha a Hui Hou!

Friday, June 22, 2012

Welcome!

A while back I wrote about getting new doors. So here is the front door and we love it!


Come on in!


Cute story about the door knob. Last year hubby and I went to Home Depot here in Hawaii and picked out this door knob.  Thinking if we pick it out in advance, when we have the time it would make things go faster when we're there.

We thought wrong. We went to every Home Depot and Hardware store between the house and Boise and couldn't find it, until the very last one. All others said they didn't carry the brand, It was being phased out. At the last one we were able to get the style, but not the color. We bought it, just so we could have a new lock on the door, since the house had been up for sale for so long.

When we got home and wanted to install the lock - the holes that were in the existing door were the wrong size and in the wrong place. We wound up put in a cheap-ie for the time being.

So as the delivery of the door was getting closer and I asked Lisa to order the door knob in the right color. Bad news was that she couldn't find it. Not the style, not the brand, nothing. 

I thought I'd  go to the place we originally found the door knob, maybe we'd get lucky, find out where we could get a replacement. 

Looking thru the shelves, they didn't have the brand anymore either. We looked and looked, nothing. A sales person asked if he could help us and I told him what we were looking for. He informed us that they no longer carried the brand and they only had a couple left in stock, up on the upper shelf (shorty me couldn't see it).

And there it was - exactly the one we were looking for. Exactly. So what did we do? We bought it, packed it and brought it "home". 

It was it was waiting for us


Aloha a Hui Hou!

Thursday, June 21, 2012

Got an Idea for the Hallway Built In

A little while back I wrote about our hallway built in


and I was pondering what I wanted to do with it. Compared to all the other built ins in the house, this is in pretty good condition and I would like to keep it, but what to do with it?

While we were there I decided to get a new front and doors made for the light room closet, a white stained ash is what I think I finally decided on (which is the same wood that we are having the murphy bed built in the wood room).

I went on to think I might get the same thing done with the built in...that is until today....just now, when I saw the Lake Girl Paints: Sand and Shells Dresser post. Love the distressed look and the colors go well with the space. I would just do it a bit lighter because the hallway is a bit dark. I would definitely still go for the vintage glass knobs that would match the glass doorknobs we put on the bedroom doors.

What do you think?

Aloha a Hui Hou!

Wednesday, June 20, 2012

Product review - Roomba vacuum

Roomba 350
 Because of all the dust storms we have at the house, I thought a Roomba vacuum would be helpful.


Although the wood floors are light colored, you don't see the dust. But you can feel it under your feet and I don't want to scratch up the floors....and with my OCD I would otherwise wind up going nuts - dust mopping several times a day.

My thought was push the button and you're done.


Yeah, not quite.

Please pay close attention to the beginning, you only get a quick glimpse of it. When the robot goes from floor to rug it leaves all the dust bunnies on the rug...wasn't too thrilled with that.

Also, several times during the cleaning process it would stop working because of error #9....I'll follow up with you when I understand what error #9 exactly is. When that happens you have to tap bumper and then press clean again. With time, the Roomba ladies voice got pretty annoying.

My over all rating wold be a 7 out of 10. It did clean the room, but I did have to follow up to get those dust bunnies. I was also a bit afraid when it bumped into things like the lanterns that you see in the clip or the side table; that it it would topple and break something.

In conclusion I would say it is more like a dust mop, not a vacuum. It is a great addition to my cleaning, but will never replace a real vacuum or dust mop.

Aloha a Hui Hou!

Tuesday, June 19, 2012

Stuh-pid Birds

One of the things we got to enjoy last summer was all the nesting birds and watching them feed their babies. This year the birds were just starting to nest.

I was surprised that on one of the first mornings I found a piece of egg shell.


A few days later while Roger was mowing/weedwhacking the tall grass he came across this nest.


We think they are quail eggs. After he cut the grass, we think the "parents" abandoned the nest.

A few days later Roger told me to get my camera and come outside. He lead me to this


Now let me zoom out so you see where it is


Yup, you're seeing right. The stuh-pd birds build a nest under the hood of the TRUCK.Why would they ever build a nest in a moving vehicle?


Naturally we couldn't leave them there. Wearing a pair of gloves I gently lifted the nest out of the engine and put them under the lilac bush (where the parents were hiding)


I included a few of the feathers so they might recognize their nest, but after a few days, the nest was still untouched. So sad :o(

Totally unrelated, one of the blogs I follow, Thrifty Decor Chick, is hosting a link page this week where you can share your yard. I'm looking forward to lots of ideas for our hole in the yard.

Aloha a Hui Hou!


Monday, June 18, 2012

Front Room Revisited

As a quick reminder, here are a couple of before pics of the West end of the front room:


In this part of the front room the only updates that were done are the kind that don't have a lot of visual impact. We had new windows put in and had them framed out like the window in the bathroom. The electrical was updated to 3 prong sockets (grounded). Lastly, the hardwood floor was sanded and resealed.

We didn't put the a/c back in and don't plan to either. The house is naturally cool and it only gets uncomfortable when a lot of people were inside. When we finally move in and we can agree on one we'll put in a ceiling fan and add more insulation in the attic.

My color and style vision for the room was beach cottage. I'm not so sure that the color I picked out is the color the girl mixed for me, but it still looks good.


The love seat was one of the pieces that Roger's parents gave us last year, as well as the side tables. The fabric was a purple floral print that didn't go to well with our colors, but a slip cover took care of that.

While we were there we also found a pair of wingback chairs that recline. Nice and comfy with brown slip covers. Just what I was looking for. They seem sturdy enough to someday be worth reupholstering.


I bought the chest last year and wanted it as a coffee table, but now with everything in place I realize it's too big. So for now it is place to put the TV, until the carpenter re works the hutch. After that we'll see what I'll do with it. 

When thinking of a rug, my mind was all over the place. I was looking at rugs that were ocean themed and more traditional rugs. I had even looked at those new traditional looking rugs that they make to look old and very warn, but  they were pretty pricey and I was just not willing to pay that price.


Then I discovered this rug at Home Goods and fell in love. It had the colors I liked, the blue, although you might not be able to tell, matches the wall paint, brown like the wingback chairs (for now) and touch of nice sandy brown like the slip cover. The red will be my POP! of color in the room. It also feels great to walk on. 

Before we left I ordered Honeycomb blinds (for the front room and bedrooms), but they won't be installed till later this month. 


We will be getting the simple version of this (only opens one way)

Finally, somewhere down the line I would like to put up wood trim, cornice boxes and get some wood on the ceiling. Like this, but not totally.


All in all, we love it and can't wait to work on it some more.

Aloha a Hui Hou!


Sunday, June 17, 2012

Bathroom Revisited

Before you go on, let me refresh your memory. This is what the bathroom looked like before.


While we were there I did some painting. Number one on my list  was the bathroom. After looking at the swatches for a few days we agreed on a lighter blue.

This is how it turned out.


This one is a little brighter
Love the way the white built in pops off the wall.
Since this was a small room and there were lots of things to tape off - it was a bit of a PITA, but I love the way it turned out and I KNOW that it will stay blue for a long, long time...lol

Shared this post with:

Thrifty Decor Chick

Aloha a Hui Hou!

Thursday, June 14, 2012

Antiquing

On our trip we did a bit of "antiquing". Nothing big, just a few small items to give our house a home-ie feel.


Let's start with the small Kraft American crate we found in a little antique shop in Caldwell. I have a crate here in Hawaii for our condiments, but it is new, made to look old. I like this MUCH better.

We had been shopping around for a spoon rest and just couldn't find something we liked - Till I saw this baby at a thrift store. In Germany it's called milk glass, unsure if that its what it is called here. On the inside it has fruit embossed on it and on the out side there are flowers. Easy to clean and dish washer safe! Just the way I like it.

The "green" collection
Currently I don't have room to store any vases, let alone have any flowers in the yard that I could put in one...so I don't really have any (I'm cheap, Ok? I don't want to PAY for flowers...lol). But at the house I will have tulips, lilacs, iris, roses and and and, so I'll be needing vases. We stopped at a local thrift shop and I became obsessed with green glass. It's all older glass and I was able to make a killing. I got it all for under $15....cool, Huh?

Vintage Mason Jars
For months I've been ogling the canning jar soap pumps that Post Road Vintage has been offering on Etsy. I planned to order 2 before we flew, but just didn't get around to it.

In the first antique shop we found a quart size jar and I thought "wait a minute! I could make that!"  Taking another look at the jar I came to realize that a quart size jar would be a bit too big to fit on the ledge of the kitchen sink.

So we kept looking. We got lucky at the thrift store and found 2 pints, two more quart size jars (that I could always use as vases) AND I found two soap dispensers with metal pumps. I was in business!

Our neighbor was so kind to drill a hole in the lids and with a glue gun I was able to secure the pumps in the lids. I love making/creating things for the house that will get some use.

The bedroom doors had the original brass door knobs, but they had seen better days. At one of the other antique stores in Caldwell we were able to get two beautiful glass door knobs.


I put them on the doors and they feel great in the hand.

The door to the wood room is still the original wood and looks great. The doors to the light room and the bathroom are painted. I hope to strip them and find that they are as beautiful as the other door.

Can't wait to get back and find some more treasures!

Aloha a Hui Hou!

Wednesday, June 13, 2012

Opps, I did it again..

I'm still in love with our driftwood lamp, but the room looks a bit lopsided


I need something for the other side. Now chances of finding another piece of driftwood like this one are pretty slim, so I have to come up with something else. A bit ago I bought a mercury glass jug and thought it might make a nice lamp. I was on the hunt for a 2nd lampshade and a kit to turn a bottle into a lamp. Turns out it was not all that easy. I had to google, call and drive around to get my parts.


Photo from this blog


With this kind of kit there is no drilling or special tools needed. All you have to do is stick the cork in and the cord runs down the back of the lamp. 

The corks that were included were a bit small to fill the neck of the jug so I wrapped a couple of pieces of fun foam around it. Now it fits perfectly.  WAH-LA, lamp #2


The room is no longer lopsided.


OH! I just checked out the vintage stuff on sale at One Kings Lane an discovered this:

You can find it here

Mercury Glass Cobweb Lamp

$999.00
$1,800.00 Estimated Market Value

WoW! That makes my lamp a STEAL!  And you know what? I like mine better! :o)

Aloha a Hui Hou!